Everyday operations: entering targets, checking materials, searching, and claiming rewards.
Current/target values and materials
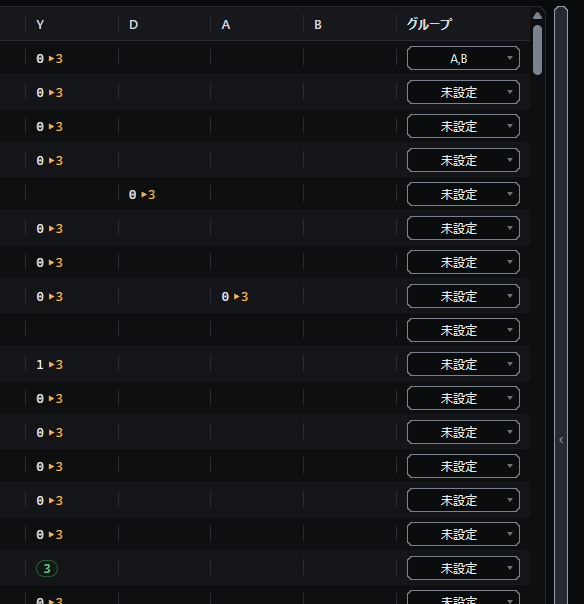
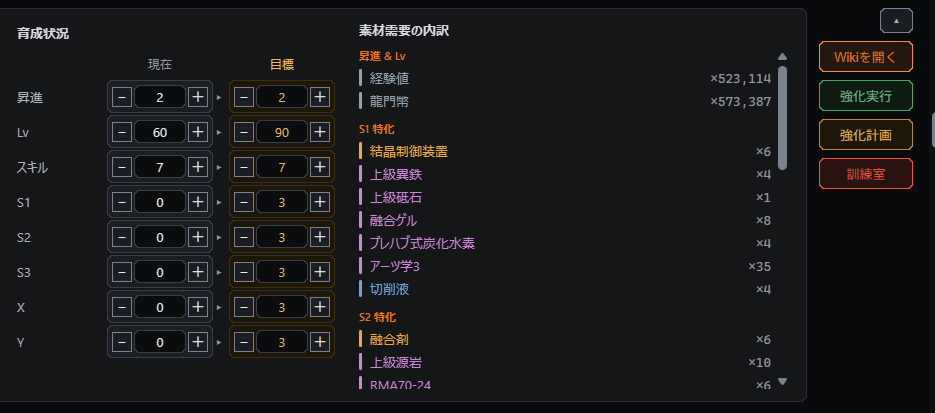
For each status in the list, click the left side to enter the current value and the right side to enter the target value. The same values can also be edited from the detail screen.
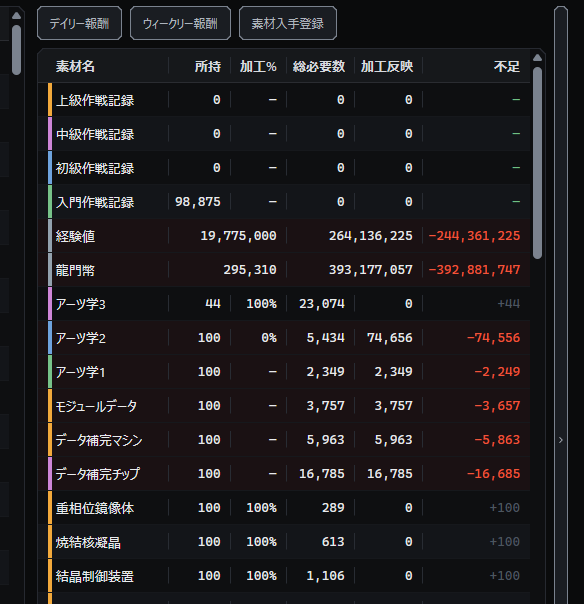
The materials needed to reach the target are calculated automatically from the difference between the current and target values. The material list on the right shows the required and missing amounts.
Pressing Enter while editing a cell commits the value and moves to the next cell. From the current value it moves to the target value in the same row; from the target value it moves to the current value in the next row. Potential and Trust have a single value each, so one Enter moves straight to the next row. Pressing Esc ends editing without committing what you typed.
InputInputCheck
Differences entered in the table or in the detail screen are reflected in the required materials on the right.
Operator search
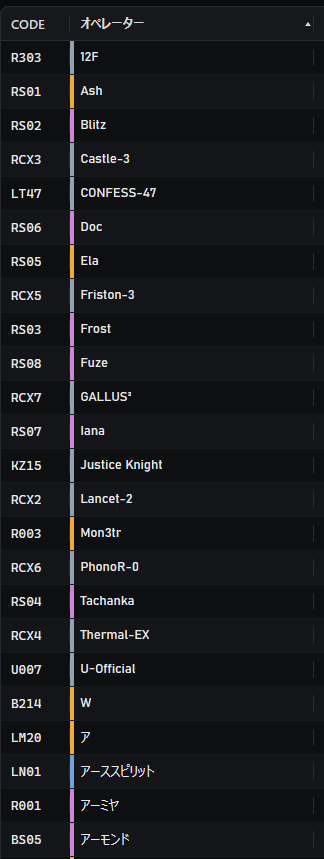
The search box searches Operator names and codes. Ctrl + F moves focus to the search box.
Sorting the list
Click a column header to sort by it. Each click cycles through ascending, descending, and off. Clicking another column header switches the sort to that column.
Operators with the same primary sort key are then ordered by training progress, Rarity, Class, and name. Training progress and Rarity always place the more developed operator and the higher rarity first, regardless of the primary key's direction.
Sorting by name lists alphanumeric names first, then kana, then kanji.
Names are ordered as in the game: alphanumeric first, then kana in gojuon order, and finally kanji in pinyin order. The same rule applies whichever display language is selected.
The sort state is not saved. Restarting the app starts with sorting cleared.
Group operators
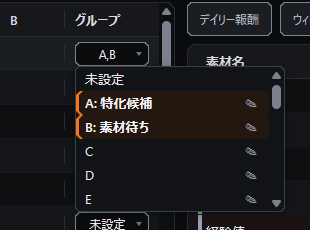
A Group is an A-Z tag you can attach to an Operator, and one operator can belong to several groups. You can set them from the dropdown in the "Group" column of the list or in the "Group" field of the detail screen.
Each click on an item in the dropdown toggles its selection, and the popup stays open, so you can keep clicking to attach several groups.
Multi-selectRename
The pencil icon at the right end of each row renames that group.
A named group appears in the list cell as "A: name", and when several groups apply, their IDs are listed separated by commas. To rename one, click the pencil icon, or highlight the item and press F2. Enter commits and Esc cancels. The "Unset" row has no pencil icon.
The filter's "Group" condition also accepts several groups. An operator matches if it belongs to any of the selected groups.
Owned and missing materials
Enter the owned amount of each material in the material table to see how much you are short of your targets.
Show/hide the material table
Click the tall bar at the right edge of the screen to show or hide the material table. The arrow on the bar points right while the table is shown and left while it is hidden.
Click to toggle
The bar stays in the same place whether the table is shown or hidden.While hidden, the operator list expands into that area.
The hidden state is not saved. Restarting the app always starts with the table shown.
Experience and Lungmen Coin
The Experience you own is calculated automatically from the amounts of the four kinds of Battle Record you own.
The Experience and Lungmen Coin needed to level up are calculated from the in-game level-up table.
Carrying over surplus Experience is not reproduced, so the values can differ from what the game shows.
Expanding required materials into lower-tier materials with Craft%
When you set Craft%, the specified share of the higher-tier materials you need is treated as crafted, and the required amounts are expanded into the lower-tier materials.
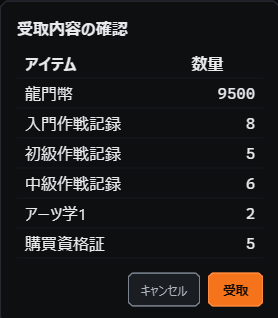
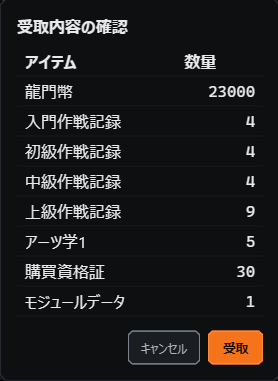
Daily and weekly rewards
Daily rewards reset every day at 4:00 AM, and weekly rewards every Monday at 4:00 AM.
Claiming daily rewardsClaiming weekly rewards
How the number of Operators owned is counted
The number of Operators owned counts every Operator whose Potential is 1 or more.
Undoing and redoing operations
Ctrl + Z undoes and Ctrl + Y redoes.
02
Detail Screen
See each Operator's information, required materials, Memo, and shared values.
Opening and closing the detail screen
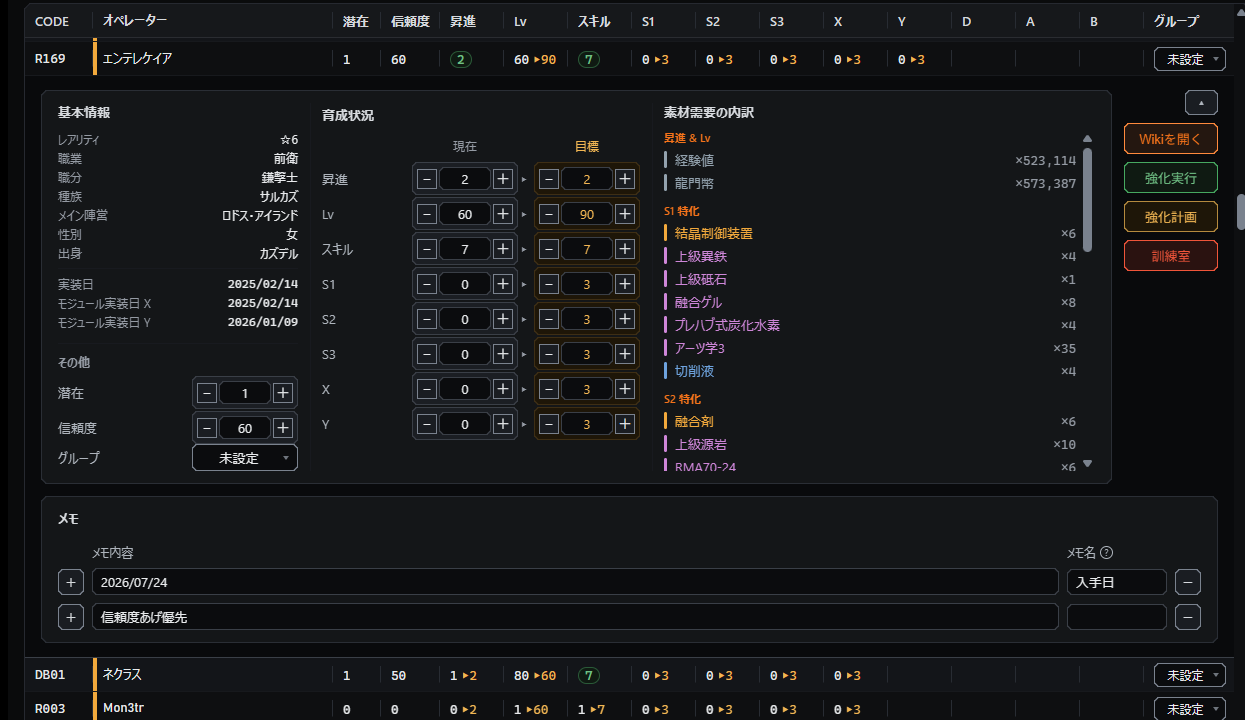
Click an operator name in the list to open the detail screen just below that row. Clicking the same name again closes it. Several detail screens can be open at the same time.
ClickThis area toggles
Clicking the name toggles the whole boxed detail area.
Checking factions
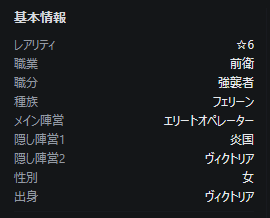
Besides "Main Faction", the basic information shows any additional factions the Operator belongs to as "Hidden Faction 1" and "Hidden Faction 2".
Blaze has the Main Faction "Elite Op" plus the hidden factions "Yan" and "Victoria".
Viewing the materials for a single operator
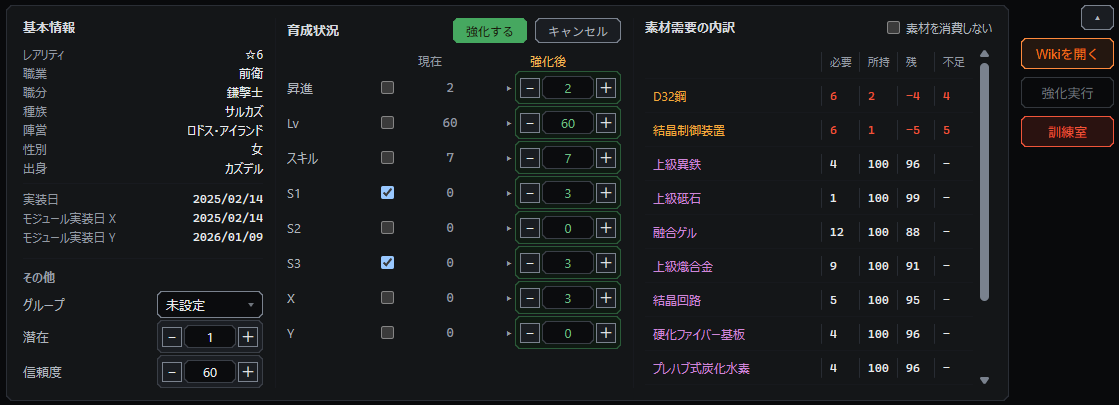
The "Material breakdown" in the detail screen shows the materials needed for that Operator alone, based on its current and target values.
Separately from the overall totals on the right, the detail screen shows the breakdown for a single operator.
Tracking Paradox clear status
You can track Paradox clear status from the detail screen. What you set here does not affect material calculation.
Open Wiki
[Open Wiki] shows the Operator's information on Arknights wiki JP. Only the Japanese wiki is supported at present.
Values shared between Operators
Trust is shared between an operator and its alternate forms.
Amiya's promoted Operators share the Trust, level, and Skill level of Caster Amiya.
Recording a Memo
A Memo is managed as a pair of "Memo" and "Memo name". Pressing [+] adds a field right after that row, and [-] deletes it. You can create up to 20 fields.
A Memo can hold text with line breaks. Memos do not affect material calculation and cannot be filtered on.
Once a Memo name is set, the field can also be added as a list column from [View] > [Column display settings]. A field with no Memo name does not become a column.
Deleting a field cannot be undone
Deleting a field discards the values entered in it for every operator at once. Check the number of affected entries on the confirmation screen before deleting.
03
Enhancement Plan
Create several targets for one Operator and work through them as you reach each one.
Creating multiple targets
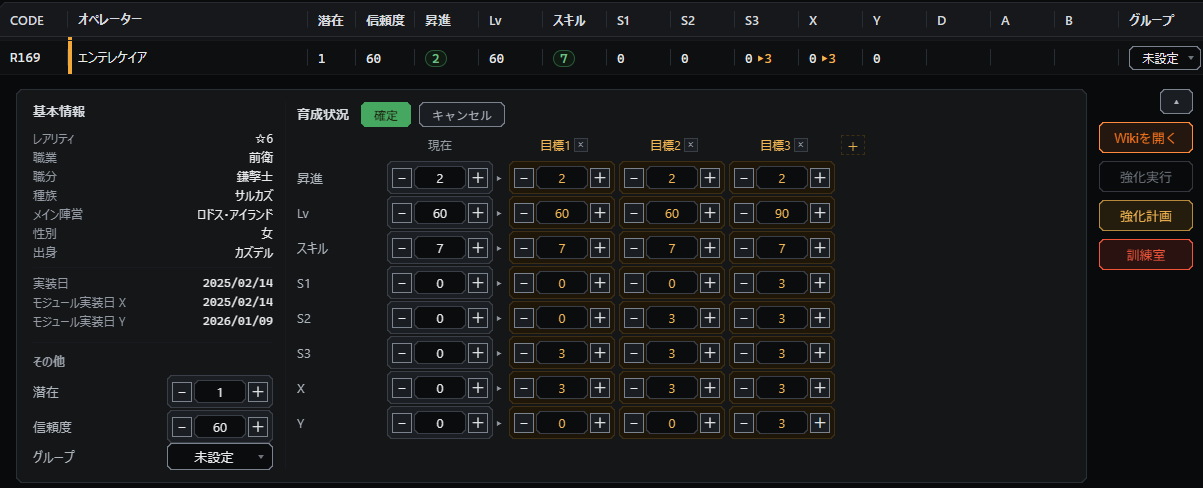
Pressing [Plan] in the detail screen enters target editing mode. The [+] to the right of the target column headers adds a target, and the new target copies the values of the one before it. The [×] in each column deletes that target.
[Apply] saves what you entered, and [Cancel] restores the contents from before editing. The plan cannot be opened while an enhancement is running.
Lay targets out side by side to build a staged training plan.
Switching the displayed target
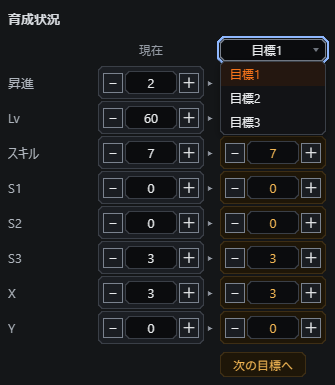
When there are two or more targets, the "Target" heading in the training section becomes a dropdown. Selecting an entry switches the displayed target, and the material breakdown is recalculated for the selected target. The values of the displayed target can be edited directly with the stepper buttons.
Display when there are two or more targetsChoose the target to display
Moving to the next target
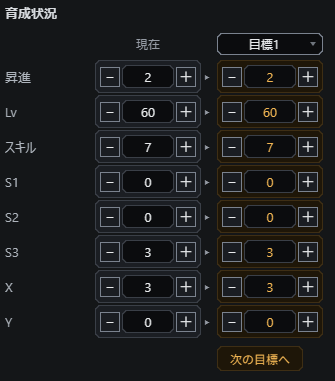
Once target 1 is reached, [Next target] becomes available. Pressing it deletes target 1 and moves target 2 and later up by one. This shift does not happen automatically, so use this button to advance.
Target used in material calculation
The required and missing amounts in the material table are calculated from target 1 only. Target 2 and later are there to check the breakdown in the detail screen and are not added to the overall required materials.
The filter's "Target achieved" condition is also judged against target 1.
04
Enhancement
Apply the training you planned to the materials you own.
Running an enhancement
[Enhance] consumes the materials up to the level you specify from the amounts you actually own and updates the Operator's current values. Check the listed scope and the materials to be consumed before running it.
Check the values to be reached and the materials consumed, then run it.
05
Training Room
Check the materials a mastery needs and when it is due to finish.
Starting a mastery
In the Training Room you can raise mastery levels by consuming materials from the amounts you actually own. You can check the required materials before starting, and the estimated finish time once it has started.
Shows the mastery target, the materials consumed, and the estimated finish time.
Checking progress on the main screen
Once a mastery starts, the field at the bottom right of the main screen shows the mastery in progress. It shows the target Operator, the Skill being mastered, the remaining time, and the estimated finish time, so you do not have to open the Training Room screen.
The mastery in progress and its remaining time appear at the bottom right of the main screen.
Ending training manually
Training in progress can be ended without waiting out the remaining time by pressing [End] in the Training Room on that Operator's detail screen. It can only be ended from the detail screen of the Operator being trained.
The materials are consumed and the mastery level applied the moment training starts, so [End] only frees the Training Room; the materials you own and the Operator's values do not change.
Training in progress can be cut short with [End].
06
Register Materials
Reflect the materials you obtained or crafted into your owned amounts in one go.
Registering acquisitions and crafting
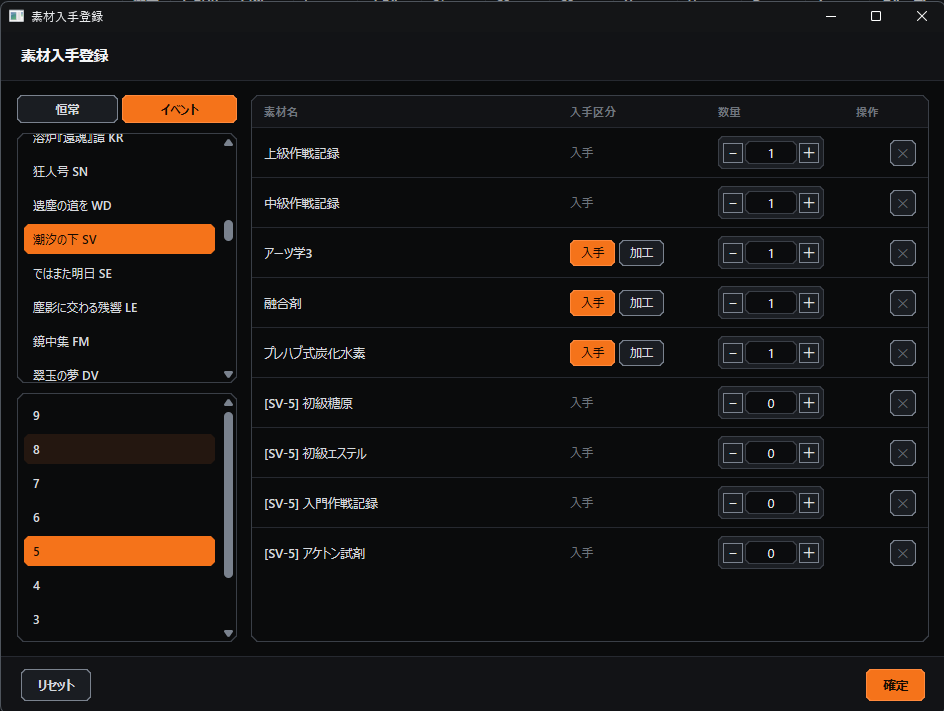
[Acquire] adds materials to your owned amounts. [Process] consumes the source materials from your owned amounts and adds the crafted ones. Check the rows you registered, then apply them all at once.
Double-clicking a Material name in the material list of the main screen adds that material as an [Acquire] row with a count of 1 and opens the Register Materials screen. Double-clicking adds rows even while that screen is closed. Double-clicking the same material repeatedly does not merge the rows; a new row is added each time.
Double-click
Double-clicking a Material name adds that material to Register Materials.Choose the kind, the material, and the count, then register it.
Registering drop materials from a stage
Selecting a stage shows the materials that drop there. The per-stage information comes from Penguin Statistics.
Rows added by choosing a stage have their kind fixed to [Acquire] and cannot be changed to [Process]. This is the same for permanent stages and event stages. Rows added by double-clicking a Material name can be switched to [Process] when the material is craftable.
Materials that cannot be entered from stage drops
Lungmen Coin and Shop Voucher are not tracked by Penguin Statistics, so they cannot be entered from stage drops.
What the reset button does
If there are registered rows, those rows are deleted. If there are none, the whole list is cleared.
07
Filter
Narrow down which Operators are shown and which ones the required materials are calculated for.
Filtering with several conditions
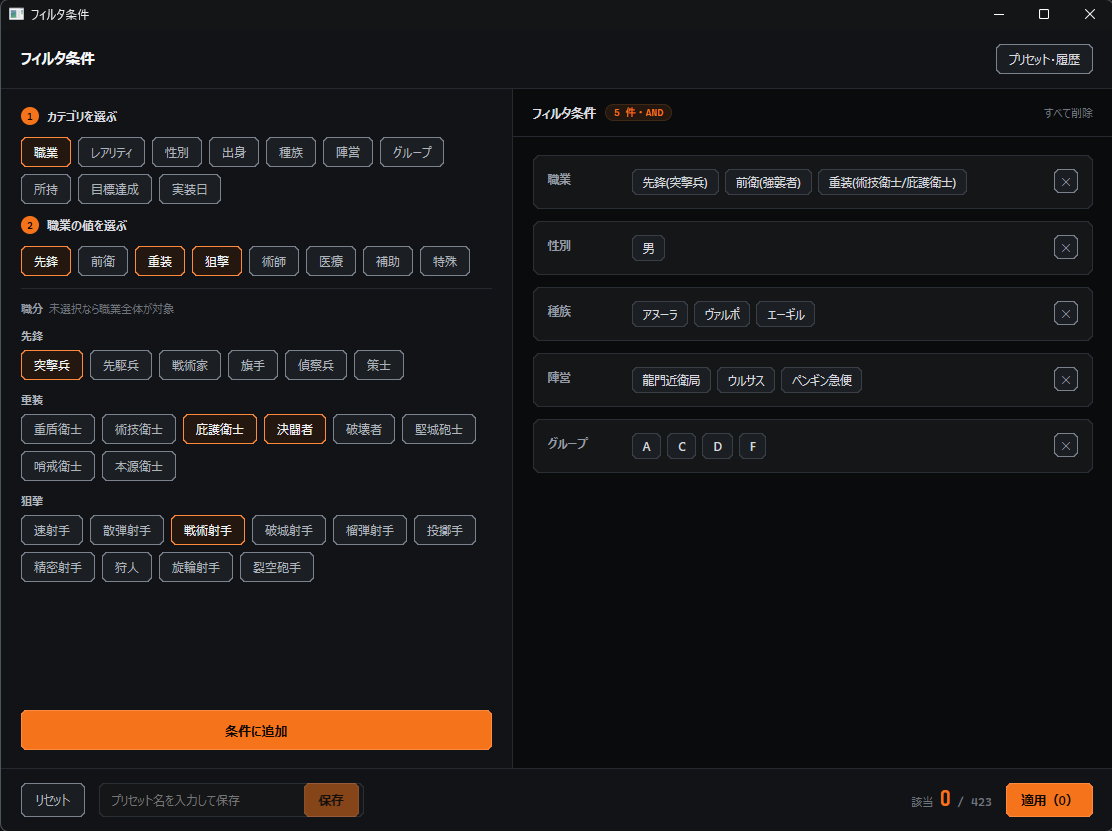
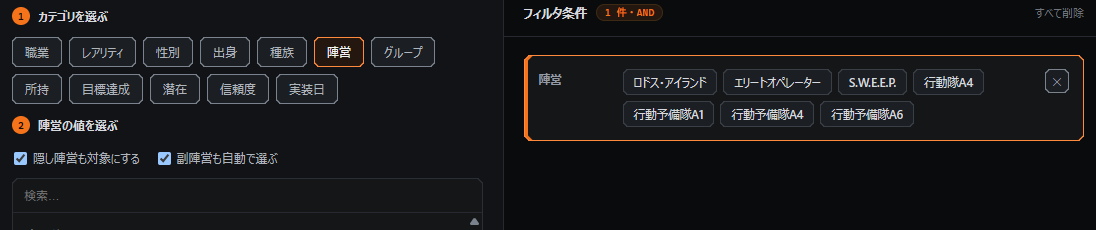
A filter can hold several conditions. Multiple selections within Class are combined with OR, and different conditions are combined with AND.
As you choose conditions you can see how many entries match.
Filtering by faction
The faction condition has two checkboxes: "Include hidden factions" and "Auto-select sub-factions". With "Include hidden factions" on, every faction the Operator belongs to is taken into account. With it off, only the Main Faction is.
Sub-factions added automatically
With "Auto-select sub-factions" on, the sub-factions of the faction you chose are added to the condition automatically.
Narrowing the required-material calculation as well
Applying a filter narrows not only the list but also the required-material calculation to the Operators that match.
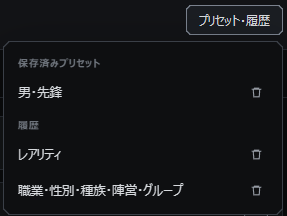
Using presets and history
Conditions you use often can be saved as presets and reused. Recently used conditions can be recalled from the history.
Presets remain after you close the app. The history is not saved, so it disappears when the app closes. Save conditions you use repeatedly as presets.
Choose a saved condition or a recently used one to apply it again.
08
Bulk target input
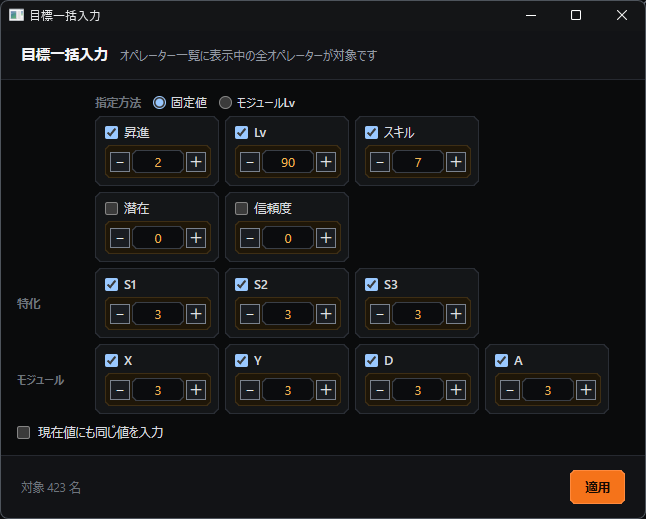
Enter target values in one go for the Operators the filter has matched.
Checking the scope and what will be entered
Bulk input applies to the Operators matched by the filter. Choose the training items to apply and enter their target values together. Turning on the option updates the current values to the same values as well.
Check how many entries are affected and which items will be applied, then run it.
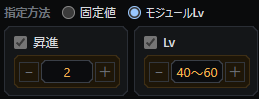
Automatic input when a Module Lv is specified
When a module level is specified, the Elite 2 level it requires is filled in automatically: level 40 for a 4-star, level 50 for a 5-star, and level 60 for a 6-star.
Levels are filled in automatically to match the module unlock requirements.
09
Event Acquisition Plans
Add the materials you expect to obtain from now on to the shortage calculation.
Creating a plan
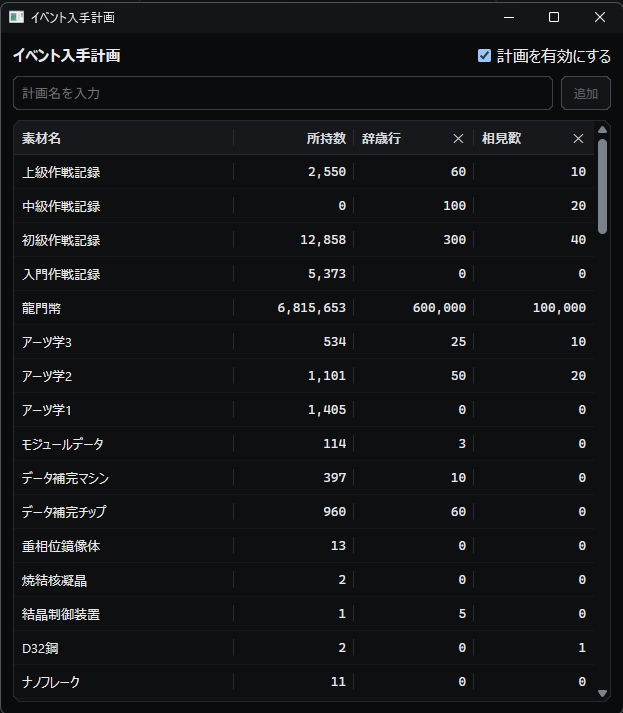
Pressing [Event Acquisition Plans] on the toolbar opens the plan window.
Enter a plan name and press [Add] to add a column with that name. Plans with the same name are allowed.
Enter a plan name and press [Add].
In the new column, enter how much of each material you expect to obtain from that event. You can create as many plans as you like.
Each plan adds one column. Two plans are registered here: "辞歳行" and "Such is the Joy of Our Reunion".
Pressing [✕] in the column header deletes that plan. Deleting it also discards the amounts entered in that column.
Calculating shortages together with owned amounts
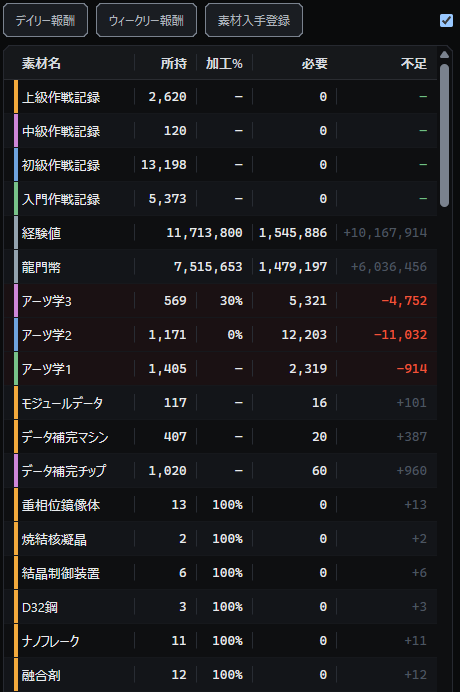
While a plan is enabled, the amount you actually own and the planned amounts of every plan are added up, and that total is shown in the owned column of the main screen. Shortages are calculated from that total as well.
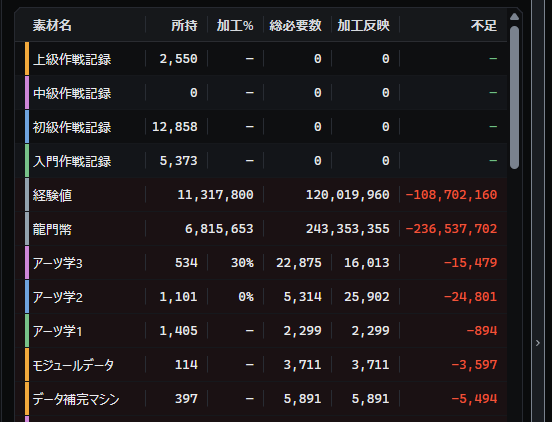
For example, suppose you own 2,550 Strategic B.R. and have entered 60 and 10 in two plans.
Owned is 2,550, and the planned amounts are 60 and 10.
The owned column of the main screen then shows the total of 2,620, and shortages are calculated from that 2,620.
2,550 + 60 + 10 makes the owned column 2,620.
While a plan is enabled, the owned column of the main screen cannot be edited. To change the amount you actually own, enter it in the "Owned" column of the Event Acquisition Plans window.
Every material is totalled the same way and reflected in the shortages.
Planned amounts are not consumed by enhancement or crafting
The planned amounts entered in Event Acquisition Plans are not consumed by crafting or by [Enhance]. Only the amounts you actually own are consumed.
Toggling plans on and off from the main screen
While the Event Acquisition Plans window is open, the checkbox on the main screen also toggles all plans on and off. It stays in sync with the checkbox inside the window.
ON/OFF
A checkbox that toggles all plans on and off appears at the top right of the material area.
10
Data Sharing
Show your current training status to a friend as a shared page.
Sharing your training status
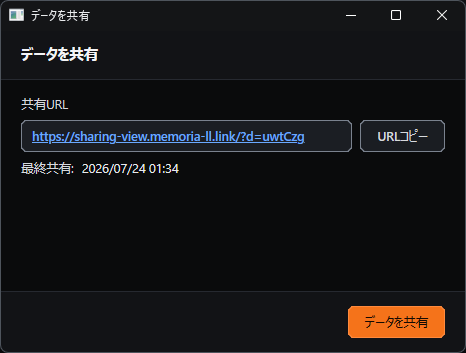
[Tools] > [Share data] lets you share your current Operator training status with a friend. Check what will be shared, then use the destination that is displayed.
The screen for sharing your current training status.
11
Penguin Statistics
Build a farming plan from the materials the app says you are short of.
Opening Penguin Statistics
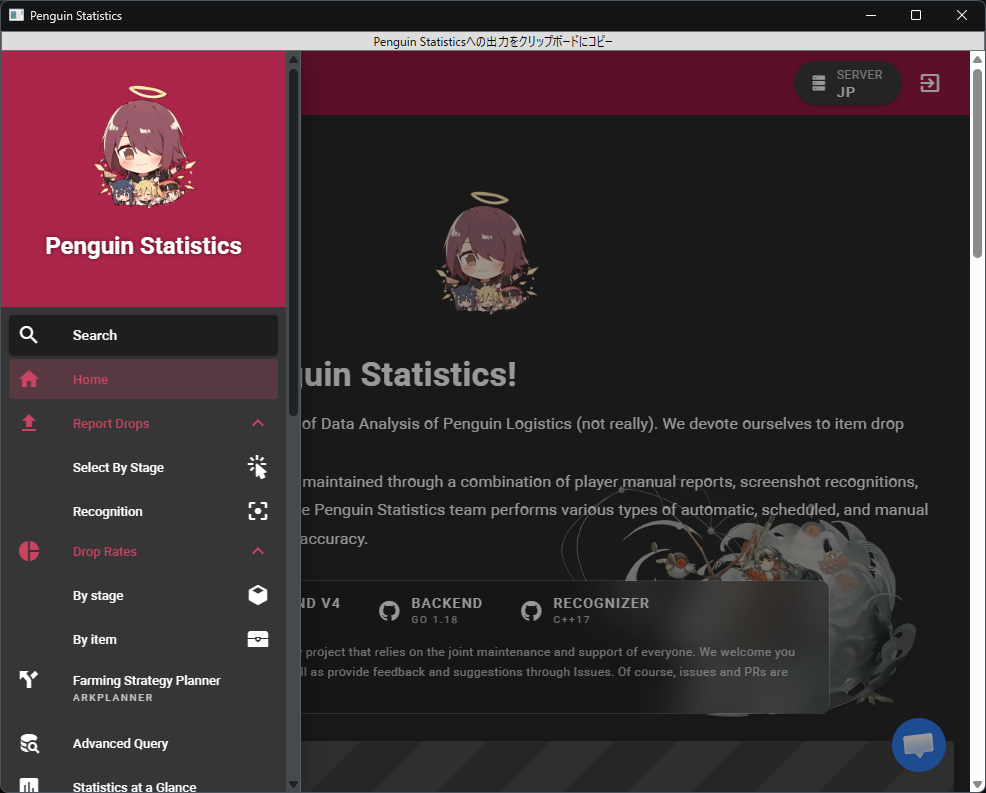
[Tools] > [Penguin Statistics] opens the site.
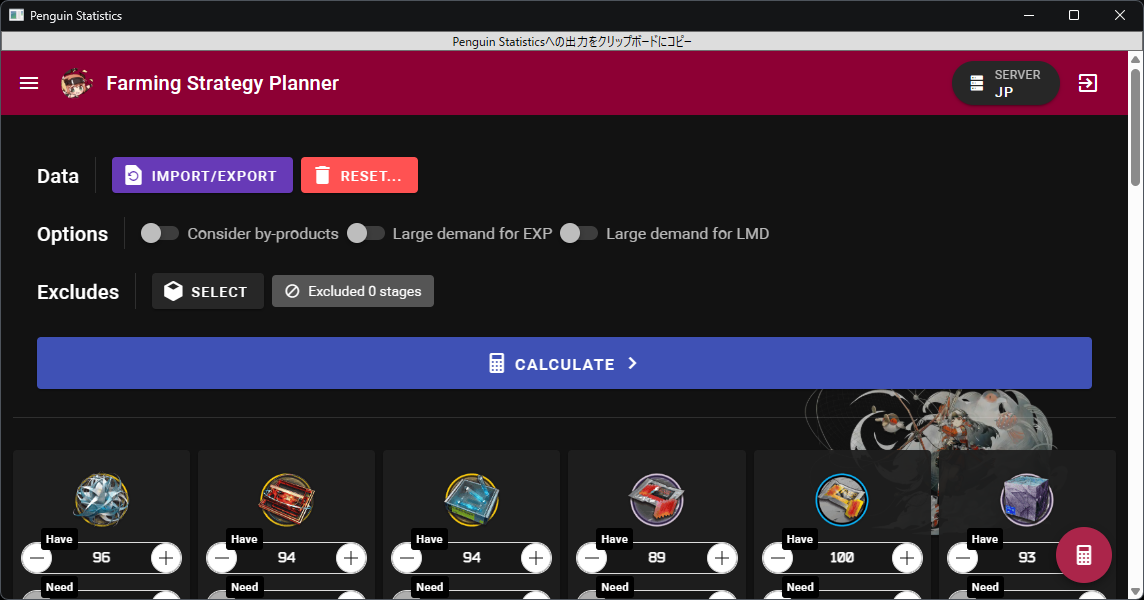
Penguin Statistics opened from inside the app.
Copying owned and shortage amounts
On the plan screen, copy the owned and shortage amounts the app calculated for each material.
Click to copy
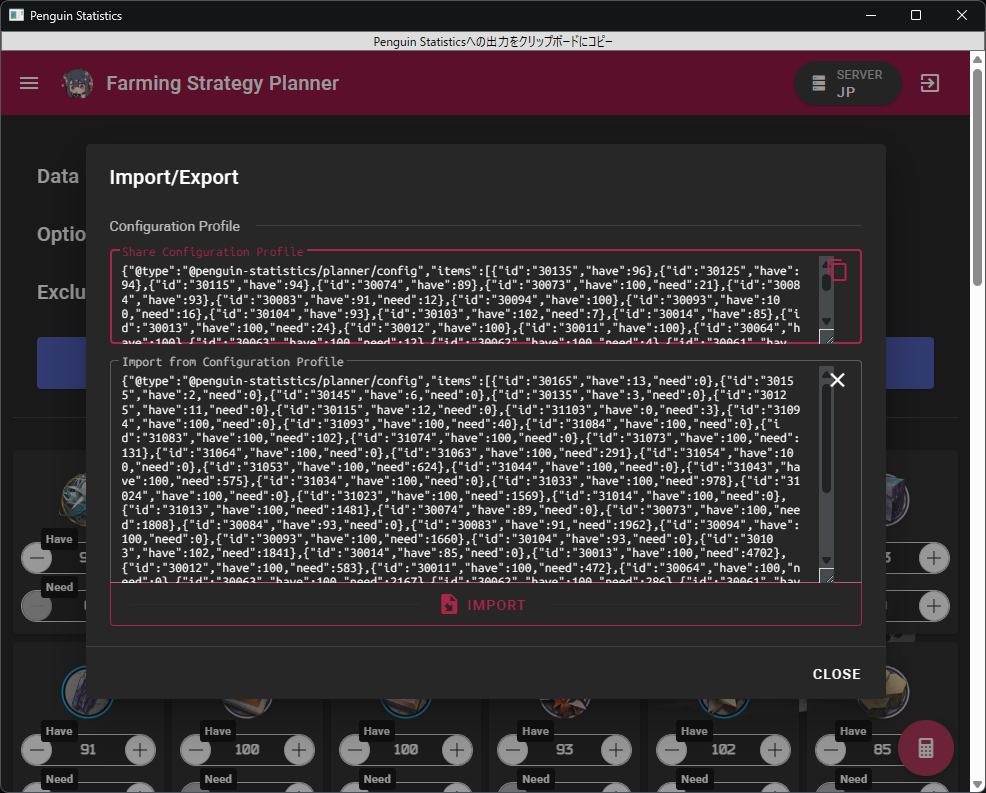
Prepares the owned and shortage amounts used for the import.
Importing into Penguin Statistics
Importing the copied text into Penguin Statistics lets you plan how to obtain the materials you are short of.
Load the copied data and move on to your farming plan.
12
View and Settings
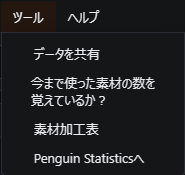
Configure the display and the helper features from the View menu and the Tools menu.
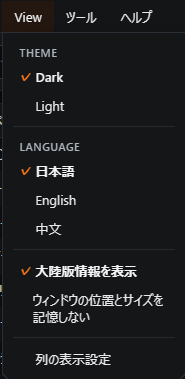
Opening the View menu
Display-related settings are collected in the View menu.
The entry point for display-related settings.
Changing which columns are shown and their order
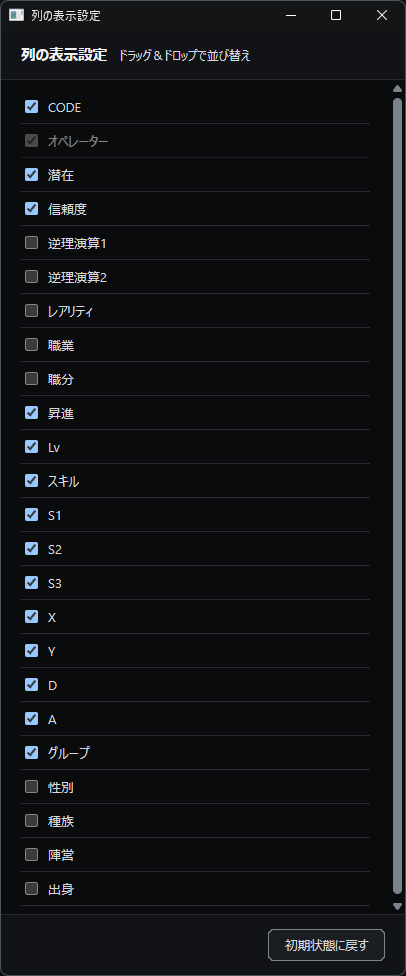
[View] > [Column display settings] changes which columns appear in the Operator table and in what order.
Choose only the columns you need and adjust the order they appear in.
Switching the theme
[THEME] switches between light mode and dark mode.
Showing mainland China preview information
Turning on [Show mainland China info] displays preview information that is not yet available in the global version.
Turning off the memory of window position and size
If the window does not return to the right position, turn on [Do not remember window position and size].
Helper features in the Tools menu
[How many materials have you used so far?] shows how many materials have gone into every Operator from Elite 0 level 1 and Skill level 1 up to their current values.
Data sharing and Penguin Statistics are covered on their own tabs.
Opens sharing, used materials, and Penguin Statistics.
13
Help and Automation
Find where help lives and when updates and saves take place.
Opening the help menu
When you want to check how something works, the help menu opens the guidance.
The entry point for the guide and app information.
Automatic updates for input data and the app itself
While the app is running it checks for updates every day at 12:00 and applies them automatically when there are any.
Automatic saving of your edits
Edits are saved automatically every three minutes, and also when the app closes.